When a serious error occurs in a Synergy program (for example, an application is terminating abnormally with a segmentation violation or signal 11 error), it can be helpful to generate a core dump file to record the current state of the program along with information about the cause of the problem, such as processor and operating system flags and information. A core dump file can be especially useful if you don’t have all of the source files for a program and can’t debug it directly. For example, if your program crashes on a production system, you can generate a core dump file and transfer it to a development system to debug it. And if a Synergy component (e.g., dbr.exe or synrnt.dll) causes a crash, you can generate a core dump file and send it to Synergex for analysis.
There are many circumstances in which you may want to generate a core dump file and many ways to do so. If you’ve opened a case with Synergex Developer Support and we ask you to generate a core dump file, we’ll typically recommend a certain method of generating the file and let you know what to send in. But this article serves as a general reference and information hub about core dumps on all supported operating systems.
This article contains the following sections:
- Before you begin (traditional Synergy)
- Creating a dump file on Windows (.dmp or .mdmp)
- Creating a core dump on UNIX (core)
- Creating a crash dump on OpenVMS (.dmp)
- Creating a dump file for an xfServerPlus segmentation violation
- Special considerations for generating a core dump on Linux
- Sending a dump file to Synergy/DE Developer Support
- More information about dump files
Before you begin (traditional Synergy)
A number of problems that can cause crashes are due to improper memory use in a program built without bounds checking. In these cases, a dump file may be unhelpful, as it would reflect the state of a program after its memory has already been corrupted. These problems can be resolved by building with bounds checking, which may generate a more meaningful error at compile time or runtime, rather than letting the program crash. If you can reliably reproduce a crash in a program built without bounds checking, we recommend rebuilding with bounds checking enabled and attempting the test case again to see if the crash still reproduces or if a more meaningful error is generated.
On OpenVMS, you can enable bounds checking by compiling with the /CHECK=BOUNDS compiler option. On Windows and UNIX, use the -qcheck compiler option. (Synergy .NET programs are always compiled as if the -qcheck option were set.)
If you determine that a dump file would still be useful, set the SIG_CORE environment variable to any value. This will disable the signal handling of system faults, allowing them to perform their default behavior. On UNIX, the default behavior is to “crash” and generate a core file, and on Windows, the access violation window is allowed to pop up. Without SIG_CORE set, the signal handling might have generated a Synergy error. Therefore, before you begin debugging in traditional Synergy, we recommend that you set SIG_CORE. For example,
- If the error is occurring in a traditional Synergy application, set SIG_CORE in the environment you use to launch the program.
- If the Synergy program is being run as a service, set SIG_CORE at the system level and reboot before proceeding to ensure the service recognizes it.
For example,
Windows: SIG_CORE=1
UNIX: export SIG_CORE=on
OpenVMS: $ define SIG_CORE "1"
Note that SIG_CORE has no effect for Synergy .NET programs. Also note that VORTEX_HOST_NOSEM has a similar effect, but only for SQL OpenNet processes on Windows (vtxnetd or vtxnet2). See the Synergy/DE documentation for details.
Creating a dump file on Windows (.dmp or .mdmp)
Although a number of different tools can generate a dump file, including Window’s Task Manager, we recommend using one of the following specialized debugging tools:
- Visual Studio, if it’s installed and available
- ProcDump, if an error condition occurs only sporadically and you want to capture a dump file automatically without user interaction
- WinDbg, in other cases
When possible, we recommend using Visual Studio, as described below. However, you can use ProcDump or WinDbg for production machines, where Visual Studio is not available. Typically, you’ll want to attach to the target process with the selected debugger, run the process until the crash (or other error) occurs, and then generate a dump file. You can also register a debugger as a post-mortem/just-in-time debugger, so it can attach to a process when it crashes.
Generating a dump file with Visual Studio
- Make sure SIG_CORE is set. (See “Before you begin (traditional Synergy)” above.)
- Start Visual Studio without a project. You can click “Continue without code” to pass the start screen. Alternatively, if the crash occurs while you’re debugging a Visual Studio project, you can open and start debugging that project and skip to step 6. (You can’t get a dump from a traditional Synergy (.dbr) program this way; instead, start the program separately from Visual Studio and attach to it.)
- Start the program that crashes.
- In Visual Studio, click the green “Attach…” button on the toolbar (as shown in Figure 1), or select Debug > Attach to Process. Alternatively, you can run the following from a Visual Studio Developer command prompt (where program.exe is the program that crashes) and skip to step 6:
devenv.exe program.exe
Note: If Visual Studio itself is crashing, you can attach to another instance of devenv.
.png)
Figure 1
In the “Available processes” list on the Attach to Process window, choose the .exe file for the program you want to capture in a dump file (see Figure 2) and then click Attach. This will likely be dbr.exe or dbs.exe for a traditional Synergy program, your own program name for a desktop Synergy .NET application, w3wp.exe for a .NET application hosted in IIS, or devenv.exe if you want to get a dump file from another instance of Visual Studio that’s crashing or hanging.
Note: If the program is running as a different user, for example, a service running as system, you may need to click “Show Processes from all users” to make it show up. In addition, you must run Visual Studio in Administrator mode to debug a service, an IIS application, or any other application running in Administrator mode.
You can select the type of code to attach to in the “Attach to” field. In most cases, the automatic option will choose the best way to attach to a process, but in some cases, you’ll want to specify it yourself. For example, if you’re debugging a .NET program that uses both managed and native code, and you know the crash occurs in native code (such as when you use AppVerifier), you’ll want to attach to native code.
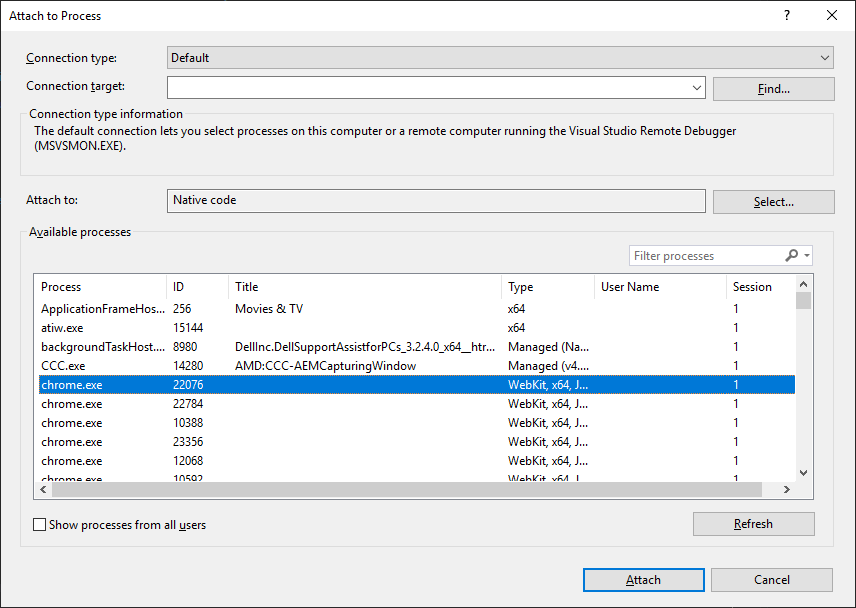
Figure 2
- Run the program as usual until it’s in an error state. For crashes and unhandled exceptions, this will typically be at the point when the debugger automatically breaks due to the crash or exception. For a non-responsive program, manually break the debugger while the program is hanging. If you’re unsure of the exact state a program should have for a dump file, contact Synergex Developer Support
- Select “Save dump as…” from the Visual Studio Debug menu:
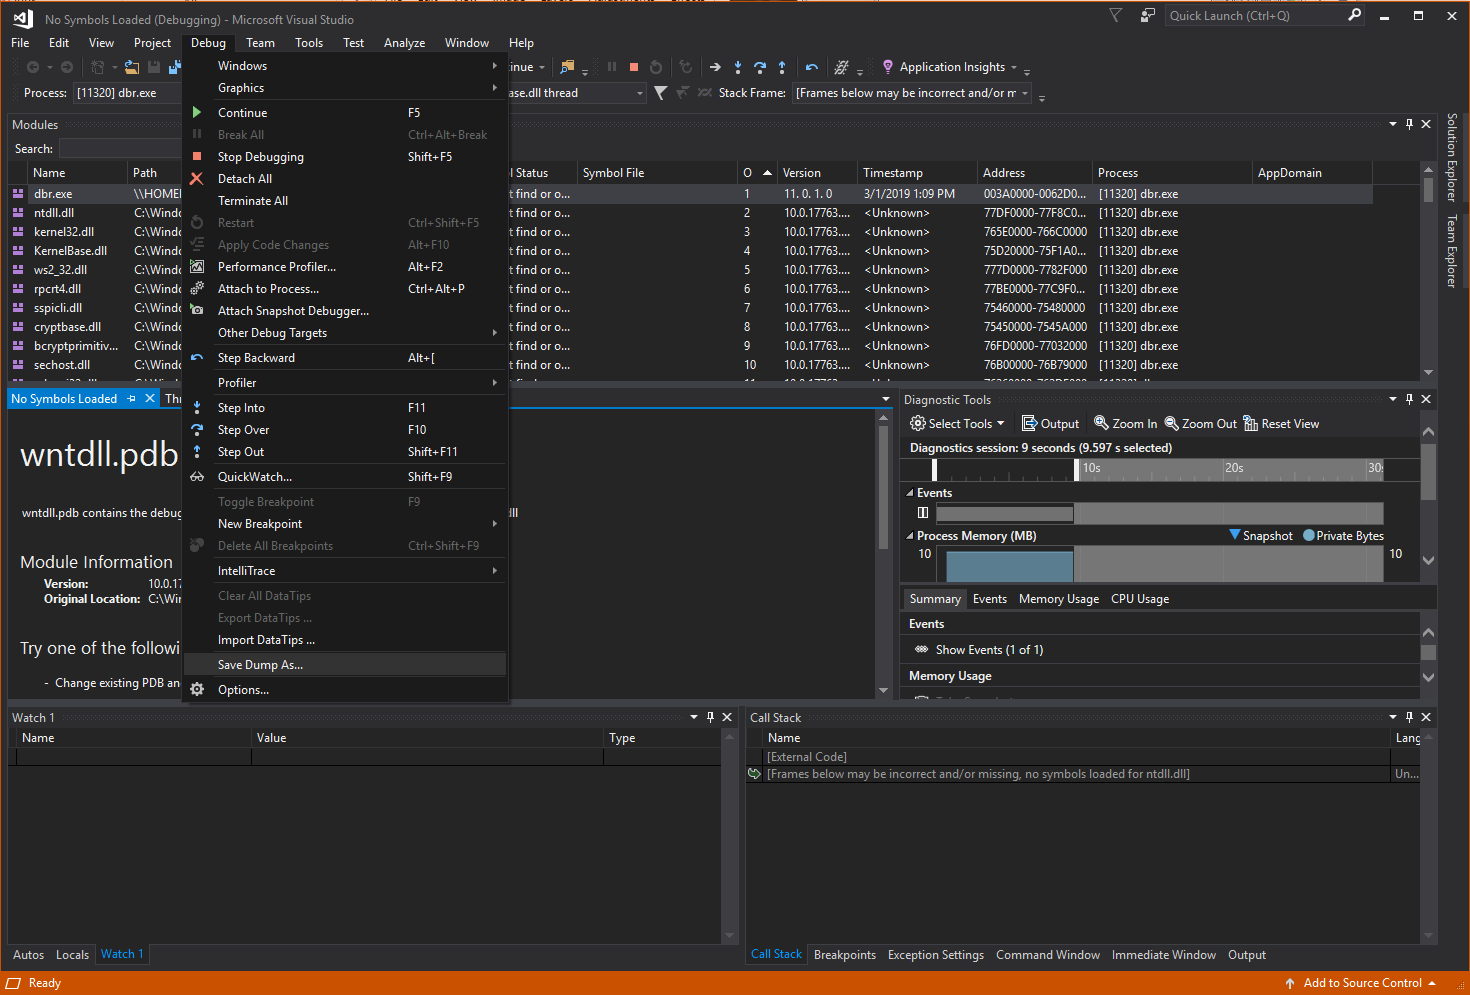
Figure 3
We recommend using the file type Minidump with Heap, as it will include memory information about the process that may be necessary to debug the problem. The other file type option (Minidump) will result in a much smaller dump file but might omit useful information.

Figure 4
- Check the dump file by opening it in Visual Studio. Make sure the listed application (check the application path) is the one that crashed.
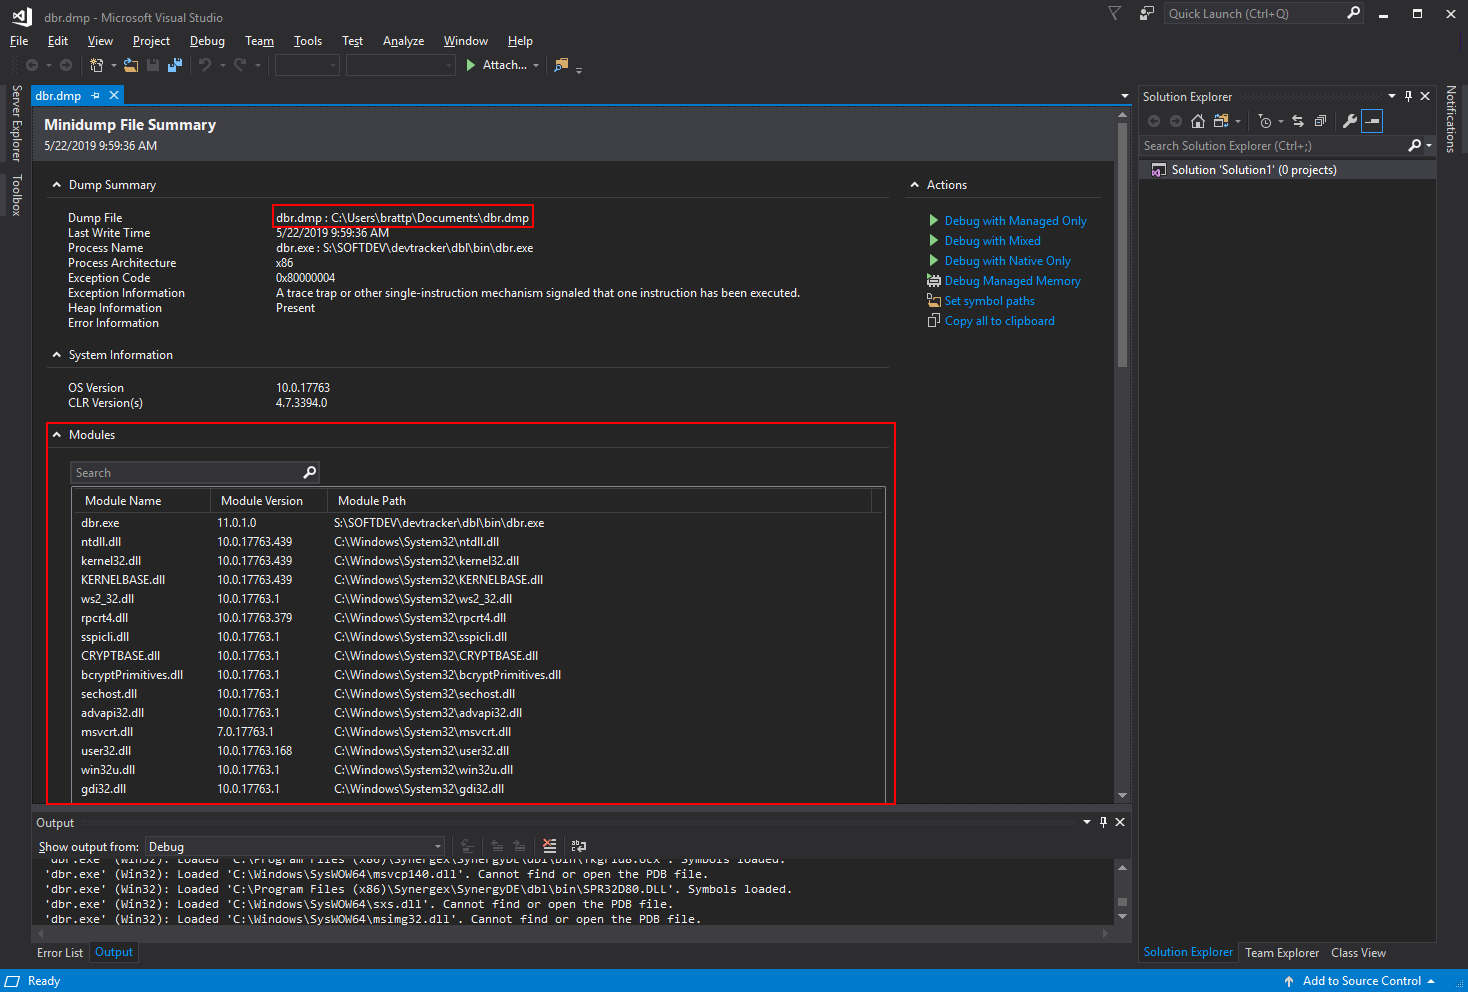
Figure 5
- If you used specific DLLs for the dump (such as a debug version of Synergy’s synrnt.dll), check the Modules window for those DLLs and verify their path.
If you’re generating the dump file for Synergy/DE Developer Support, you’ll need to send in all your non-Microsoft DLLs/assemblies and the current Synergy components, as well as the dump file. Contact Synergy/DE Developer Support for details on which files to include, which depends on bitness (32 or 64).
Generating a dump file with ProcDump
ProcDump is a lightweight command line tool. For non-interactive processes running on a machine without Visual Studio, you can use ProcDump to generate a dump file simply and effectively from a running process. While WinDbg and Visual Studio have more interactive features to help debug a running process, the real advantage of using ProcDump over those other tools is its ability to monitor a process and automatically generate a dump file in response to a trigger, without any user interaction.
- Make sure SIG_CORE is set. (See “Before you begin (traditional Synergy)” above.)
- If you don’t already have ProcDump, get it here: https://docs.microsoft.com/en-us/sysinternals/downloads/procdump. (The download page also explains how to use ProcDump if you need further functionality beyond the scope of this article.)
- Get the process ID of the running program that is going to crash, using Task Manager or something similar. Use this ID to identify the process in the ProcDump command line. You can use the process name (e.g., dbr) instead of the pid, but this won’t work if multiple processes with the same name are running when you launch ProcDump. Optionally, you can specify a path and filename for the dump file generated.
- The simplest use of ProcDump is to generate a dump on a running process. If you want to generate a file immediately, rather than waiting for some trigger, run the following:
procdump -ma pid[optional_dump_file_name]
The -ma option tells ProcDump to generate a full dump file, which will generally include more information and be more helpful than other dump file types. If you don’t specify a name for the dump file, ProcDump will generate a name based on the name of the process and the current time.
However, typically, you’ll want to generate a dump after some event, so you can alternatively tell ProcDump to generate a dump file when a certain event occurs to trigger it. Typical triggers you might want to specify are a process termination (-t), an unhandled exception (-e), or memory use reaching a certain threshold (-m mb). For example, if you know a process that you’re running will get an unhandled exception, you can run this command:
procdump –ma -e pid [optional_dump_file_name]
Continue running the program until the problem reproduces. ProcDump should monitor the process until then, at which point it will generate a dump file.
One thing to keep in mind with Windows is that your program might be managed (.NET) code or a mix of managed and unmanaged (native) code. In the latter case, you might have trouble generating a dump file. Using the -g switch (along with your other desired options) will cause ProcDump to debug in native-only mode, which may help capture the dump file. But this doesn’t work with some triggers (e.g., -t).
The options we’ve discussed so far require you to identify a running process (either by name or pid), but you may want to use ProcDump to generate a dump file with a process that is not yet running. For example, you might want to use ProcDump with a process that crashes as soon as it starts or that only sporadically encounters an exception. In these cases, you can register ProcDump as the system’s “Just-In-Time” (AeDebug) debugger:
procdump –ma -i [optional_path_to_dump_file_location]
This will cause ProcDump to automatically generate a dump file when any program crashes or generates an unhandled exception. (Note that you can’t specify triggers when registering ProcDump with -i.) The generated dump files will have the default name and will be generated in the location where you ran the command, unless you specify a different path.
To remove ProcDump as the Just-In-Time debugger and restore the previous configuration, run
procdump –u
Generating a dump file with WinDbg
Note: If you’re using a Windows system with access to the Microsoft Store app, you might want to consider using the Store version of WinDbg, called WinDbg Preview, rather than the legacy version. WinDbg Preview has an improved interface and advanced features like Time Travel Debugging, which go beyond the scope of this article.
- To create a dump file with WinDbg,
- Make sure SIG_CORE is set. (See “Before you begin (traditional Synergy)” above.)
- Open the Windows debugger by selecting Start > All Programs > Debugging Tools for Windows (x86) > WinDbg.
- Launch the application.
- Select File > Attach to a Process.
- Select the running process to attach the debugger in the list of running processes (for example, a dbr or rsynd), making sure not to attach to a thread below the process.
- Click OK. (At this point WinDbg is either attached to the process, and the debugger will stop and prompt you for input, or you’ll see the error “Could not attach to process process_ID_number. Win32 error Windows_error_number. Access is denied.” If you get this error, click OK in the message window and exit WinDbg. Then restart WinDbg in administrative mode and try again.)
- Perform the required steps to reproduce the issue:
- Select Debug > Go.
- When the problem occurs and the debugger breaks, select View > Processes and threads, and select the first thread in the list.
- On the debugger command line at the bottom of WinDbg, type the following command (note that the period in front of the command is essential):
.dump /mfa /u filepath\\filename.dmp
where filepath is the path to a directory that the current user has write permissions to and filename.dmp is the name you want to give the dump file.
Creating a core dump on UNIX (core)
You must take two factors into account when generating a core file with a Synergy program on UNIX: the system ulimit as it pertains to core file generation and the Synergy/DE SIG_CORE environment variable.
To determine the size at which a system is set to generate a core file, use the ulimit -a command. Executing ulimit with the -a switch shows all current limit values on the system. On Linux, the default is 0, which means no core file is created. The value that refers to core files is labeled “core file size” or simply “coredmp” on some systems. Typing “ulimit -c” should show the current setting.
To set the size of the core file, use the ulimit -c command. For example, to set the size of the core file to be unlimited, issue the command
ulimit -c unlimited
Note: Due to AIX security, you must ensure the SETUID bit is not set on any programs, so for example, generating a core file for rsynd would require the command “chmod -s rsynd” to remove the s bit.
Once you’ve confirmed that the system will generate a core file, make sure SIG_CORE is set. (See “Before you begin (traditional Synergy)” above.)
By default, the user process’s core file is generated with the name core to the current directory of the application; however, the name and location are configurable, so the name and directory on your system may differ.
Once the core file is generated, send it to Synergy/DE Developer Support so it can be analyzed it for information about the error. (See “Sending a dump file to Synergy/DE Developer Support” below.)
An alternate way to generate a core file is to use the system’s debugger. For example, on Linux systems you can use gdb:
- Start the failing program with gdb, or use “gdb -p PID” to attach to an existing process.
- If the crash occurs in a process that the current process will spawn (instead of the current process itself), type “set follow-fork-mode child” so the debugger will follow execution to the first child.
- Run “call mcheck(0)”.
- Run “continue”.
- Execute the program until the crash reproduces.
- Back in gdb, run “bt” to get a back trace.
- Run “generate-core-file” to generate the core file.
You can use this to generate a core file if the normal method doesn’t work. Send the back trace and core file to Synergex.
Note that, if possible, you should reproduce the crash with a debug version of the Synergy executable (ask Synergy/DE Developer Support). That way, the core file and traceback will include symbols that can help us determine where the problem occurred. Following Synergy version 11.1.1f, most Synergy executables are distributed with symbols to allow for easier fault tracing.
Another way to force a core file from a running program is to send the process a SIGQUIT signal (kill -3 pid) or a CONTROL-\\ if you are attached to the program.
See section “Special considerations for generating a core dump on Linux” for more information specific to Linux.
Creating a crash dump on OpenVMS (.dmp)
Ensure you have the latest Synergy/DE version installed (11.1.1f or higher), which includes the .dsf files created by OpenVMS for the following executable files: synergy_sdms, gsd0_so, ssqlrtl, vtx4_so, vtxhost, synrtl, rsdmse, rsynd, and xfpl_dtl. These .dsf files contain symbol information for the executables and are placed in the directory next to their corresponding executable.
In order to analyze a .dmp file from a dbr program the debugger must have access to the correct synrtl.dsf file, which means that the DBG$IMAGE_DSF_PATH logical must be pointing to the location of the copy of synrtl that the program is using. For example:
$ show log DBG$IMAGE_DSF_PATH
%SHOW-S-NOTRAN, no translation for logical name DBG$IMAGE_DSF_PATH
$ show log synrtl
"SYNRTL" = "SYS$COMMON:[SYSLIB]SYNRTL.EXE" (LNM$PROCESS_TABLE)
"SYNRTL" = "SYS$SHARE:SYNRTL.EXE" (LNM$SYSTEM_TABLE)
$ define DBG$IMAGE_DSF_PATH SYS$COMMON:[SYSLIB]
$ show log DBG$IMAGE_DSF_PATH
"DBG$IMAGE_DSF_PATH" = "SYS$COMMON:[SYSLIB]" (LNM$PROCESS_TABLE)
Make sure SIG_CORE is set. (See “Before you begin (traditional Synergy)” above.) To define SIG_CORE for the duration of the current user session, run
$ define SIG_CORE "1"
If you only want to enable SIG_CORE for the next process you run, enter
$ define/user SIG_CORE "1"
To enable dump file generation, enter
$ SET PROCESS/DUMP/ID=pid
where pid is the process ID of the program that is expected to crash. Or simply omit the ID argument to enable dump file creation in general for the current user session. The .dmp file will be created when the program crashes. If you want to generate a dump file immediately instead of waiting for a crash (e.g., if a program is hung), enter
$ SET PROCESS/DUMP=NOW/ID=pid
The .dmp file will be created in the login directory of the process running the program. For example, with xfServer, if you’re running rsynd with /default_user=mydev, the file will be created in the [mydev] directory.
You can analyze the dump file by running either
$ analyze /crash_dump filename.dmp
or
$ analyze /process_dump filename.dmp
For more information about the System Dump Analyzer utility, invoked with the analyze/crash_dump command, see https://wiki.vmssoftware.com/SDA and https://docs.vmssoftware.com/vsi-openvms-dcl-dictionary-a-m/#BLUE_7. For more information on the analyze/process_dump command, see
https://docs.vmssoftware.com/vsi-openvms-dcl-dictionary-a-m/#BLUE_13.
Creating a dump file for an xfServerPlus segmentation violation
Signal 11 and segmentation violation errors indicate that improper memory access was attempted.
Troubleshooting questions
- What functionality do the lines of code referenced in the traceback perform, and does the traceback always contain the same message and line numbers when the segmentation violation occurs?
- What steps lead up to the error?
- Is it reproducible? Can it be reproduced every single time with a certain sequence of events?
- How frequently does it occur?
- Which versions of the operating system and Synergy/DE are involved?
- Is the application local or run from a server? If the application is run from a server, try moving all of the executables and libraries to the local system as a test.
- Does the machine with the error experience any other issues? For example, do frequent system crashes or errors occur?
Troubleshooting steps
- Enable bounds checking by compiling your application with -qcheck or -B. This will identify any subscripting errors which can be corrected.
- On Windows, after resolving all application subscript errors, if the problem is still occurring, use procdump to generate a process dump. Put a copy of procdump.exe from the SysInternals tools (by Microsoft) in your path. Information on Procdump is available at https://technet.microsoft.com/en-us/sysinternals/dd996900.aspx
Setting up for a dump
- On a Windows server, set SIG_CORE=1 to be a system-wide environment variable (Control Panel > System > Advanced system settings > Environment Variables) and reboot. On a UNIX server, set SIG_CORE=1 in the terminal session and run “ulimit -c unlimited”.
- Start the xfServerPlus service.
- On the client, run your problem application, stopping before the crash occurs.
- On a Windows server, run ProcDump to automatically create a dump file when the dbs process crashes, as described in “Generating a dump file with ProcDump” above. On UNIX, a core dump should be created without any additional input, as described in “Creating a core dump on UNIX (core)” above.
- Continue running the program until the server crashes and generates a dump file or core dump.
Example output
For an example of this process, see the sample programs below. The segvio.dbl source file contains a server-side method that will crash when it’s called. Testit.dbl is a client-side program that will connect to the server and wait for user input before calling the method and causing the crash. To test it, build segvio.dbl into an elb (“TESTDIR:segvio.elb”), create or modify an SMC with the method information, build the Testit client program, and follow the steps above.
segvio.dbl
{xfMethod(interface="segvio",name="segvio",elb="TESTDIR:segvio",id="segvio")}
.subroutine segvio
.proc
xcall xsubr(^x(123456789))
xreturn
.end
Testit.dbl
.include"DBLDIR:rxapi.def"
record
machine, a80
aport, a8
.align
record
port, i4
status, i4
syserr, i4
netid, i4
.proc
xcall flags(4020, 1)
open(1, o, "TT:")
writes(1, "Generate remote SEGVIO")
writes(1, "")
writes(1, "Enter EOF to terminate program.")
writes(1, "")
display(1, "Enter machine: ")
reads(1, machine, done)
display(1, "Enter port number: ")
reads(1, aport, done)
onerror done
port = aport
offerror
status = %rx_start_remote(netid, machine, port)
syserr = %syserr
if (status)
begin
writes(1, "Unable to connect to remote session:")
writes(1, " status = " + %string(status))
writes(1, " syserr = " + %string(syserr))
goto quit
end
do forever
begin
display(1, "Press Enter to do remote call: ")
reads(1, aport, done)
xcall rxsubr(netid, "segvio")
end
done,
offerror
writes(1, "")
xcall flags(7004020, 1)
if (netid)
xcall rx_shutdown_remote(netid)
quit,
close 1
stop
Special considerations for generating a core dump on Linux
Some Linux systems won’t automatically generate a core file when a program crashes, even when SIG_CORE is set and “ulimit -c” is unlimited. Here are some things that have been found to be helpful in getting Linux to generate a core file. Note that many of the files mentioned here will require root privileges to modify, so be careful and consider making backups so you can revert any changes.
You can test how a Linux (or Unix) system is handling crashes by using “kill -s 11” to simulate a segfault in a running program. For example:
$ sleep 20&
[1] 50272
$ kill -s 11 50272
[1]+ Segmentation fault (core dumped) sleep 20
This starts a 20-second sleep command and moves it to the background. The “kill” command sends signal 11 to the PID of the sleep process, causing it to report a segmentation fault when it terminates and to generate a core file if the system is set up appropriately.
To see how the system is configured to handle core dumps, examine the file /proc/sys/kernel/core_pattern. This file ostensibly dictates the name that will be used for a generated core file, e.g., “core-%p-%t” to generate a file with the PID of the process and the current time in the filename. However, most Linux distributions use a core_pattern that starts with a pile character “|”, e.g.,
|/usr/share/apport/apport %p %s %c
|/usr/share/apport/apport -p%p -s%s -c%c -d%d -P%P -u%u -g%g -- %E
|/usr/libexec/abrt-hook-ccpp %s %c %p %u %g %t e %P %I %h
|/usr/lib/systemd-coredump %P %u %g %s %t %c %h %e
In these cases, the core_pattern isn’t used directly as a name for a generated core file, but is instead a command line for a separate program the system uses to handle crashes. Depending on how this program is set up, it may or may not put a copy of the core file in the current directory.
If you edit /proc/sys/kernel/core_pattern to simply say “core,” any crash should generate a file named “core” in the current directory (or named “core.PID” if /proc/sys/kernel/core_uses_pid contains “1”). The contents of the core_pattern file should be reverted to the default values for the system when the system reboots, but you should still take caution when modifying kernel parameters like this.
If you’d prefer not to modify core_pattern, you can work with the utility the system uses to handle crashes. You should consult the documentation for the program and distribution for definitive usage information. But below are some steps we’ve found helpful to get crash dumps for Synergex programs on specific systems.
apport (Ubuntu 20.04)
By default, apport doesn’t seem to handle crashes by processes that aren’t distributed via package (e.g., Synergex products). You can change this behavior by setting a config file for the current user. Create (or edit) the file “~/.config/apport/settings” and make sure it contains the following lines:
[main]
unpackaged=true
When a crash occurs, apport will create a .crash file in /var/crash. The file should have a name in the format of Path_To_Executable.UID.crash, e.g., “_bin_sleep.10152.crash.” To get a usable core dump from this file, you should use apport-unpack to extract the contents of the file into a new directory, e.g., “apport-unpack /var/crash/_bin_sleep.10152.crash sleepcrash.” One of the files in the directory should be named CoreDump, which is the core file. The other files in the directory may also be helpful in determining the cause of a crash, so you can send the entire contents of the directory to Synergex (provided that they don’t contain any sensitive information).
abrt (CentOS 7)
On CentOS 7 (and presumably Red Hat Enterprise Linux 7), the abrt program behaves similarly to apport on Ubuntu. By default, it won’t handle crashes from unpackaged programs. But you can edit the configuration files to change this behavior and make it more likely to get useful data for debugging a crash:
/etc/abrt/abrt-action-save-package-data.conf:
ProcessUnpackaged = yes
# Capture crash data from unpackaged executables, e.g., Synergex programs
/etc/abrt/abrt.conf:
MaxCrashReportSize = 0
# Don’t limit the size of a crash report
AutoreportingEnabled = no
# If the system automatically uploads reports for crashes, you may want to temporarily disable this when handling crashes for unpackaged processes
/etc/abrt/plugins/CCpp.conf:
MakeCompatCore = yes
# Create a copy of a core file in the current directory of the crashing process in addition to the default abrt location.
MaxCoreFileSize = 0
# Don’t limit the size of a core file
SaveBinaryImage = yes
# Make a copy of the executable that caused a crash
CreateCoreBacktrace = yes
# Generate a backtrace for easy reference outside of a debugger
SaveFullCore = yes
# Save a full core file in the default directory
When a crash occurs, abrt will create a directory under the DumpLocation (specified in abrt.conf; by default /var/spool/abrt, and only accessible by super user unless “PrivateReports = no”) and file it with the core file and other files related to the crash. The directory should have a name with the format “ccpp-datetime-PID,” e.g., “ccpp-2023-01-12-10:20:48-19681.” Note that a new directory will not be created when a program crashes if a crash directory already exists for that executable. If you want to get multiple core files from the same program, you’ll need to delete the existing crash directory (and all of its contents) first.
As with apport on Ubuntu, the ancillary files in the crash directory may be helpful in determining the cause of a crash, so you may want to send them to Synergex along with the “coredump” file.
systemd-coredump (RHEL 8 and 9 and equivalents: CentOS 8, Rocky Linux 9, etc.)
When sytemd-coredump encounters a crash, its default behavior is to record details about the crash to the journal. If ulimit allows the creation of core dumps and sytemd-coredump is configured appropriately, it should also save a copy of the core dump to /var/lib/systemd/coredump. This copy is not in a format that can be easily accessed directly. Instead, you can use the coredumpctl utility (as a privileged user) to view and access any saved core dumps.
Running “coredumpctl” or “coredumpctl list” will show a list of core dumps that are currently saved, and “coredumpctl info” will show additional details about the most recent crash. You could run “coredumpctl debug” to attach directly to the latest core dump with a debugger like gdb. But to save the most recent core dump in a format that can be accessed by gdb outside of coredumpctl (and sent to Synergex), run “coredumpctl dump --output=corefilename”.
Note that you may need to type “q” to exit coredumpctl’s paged output and return to using the terminal. Also note that core dumps are automatically deleted after a while, so it’s better to save off a copy sooner rather than later. Refer to the man pages for systemd-coredump and coredumpctl for more information.
Sending a dump file to Synergy/DE Developer Support
If you’ve generated a dump file because of an issue with Synergy components, there are a few things to consider before sending it to Synergy/DE Developer Support.
Dump files include the memory in use by a program, which could include user data. Depending on the situation, this data may include sensitive or restricted information (e.g., credit card numbers or medical data). If there’s a possibility that the dump file could include such information, please do not send it to Synergex, as policy prevents us from storing such data on our systems. Instead, contact us so we can work out an alternative way to analyze the dump file.
Much of the useful information in dump files relies on debug symbols for the various program modules used by the process. In order for Synergex to analyze a dump file, we’ll need copies of the relevant executables, shared libraries, assemblies, debug symbol files, etc., that were being used by the process associated with the dump file. These files need to be in one directory so Developer Support can go through the dump file.
Whenever you submit a dump file, you’ll typically need to send the following files as well:
Traditional Synergy process on Windows
- dbr.exe and dbr.pdb
- sdms.dll and sdms.pdb
- synwin.dll and synwin.pdb
- synnet.dll and synnet.pdb (if the .NET API is involved)
- Any other .dbr and .elb files used by the application
Synergy .NET process
The following files are located in the Global Assembly Cache (GAC), e.g., C:\\Windows\\Microsoft.NET\\assembly\\GAC_32\\synrnt\\v4.0_4.0.0.10__114c5dbb1312a8bc for a 32-bit process and C:\\Windows\\Microsoft.NET\\assembly\\GAC_64\\synrnt\\v4.0_4.0.0.10__114c5dbb1312a8bc for a 64-bit process:
- synrnt.dll and synrnt.pdb
- synrtl.dll and synrtl.pdb
- synwnd.dll and synwnd.pdb
If you open a dump file in Visual Studio and look at the Modules window (Debug > Windows > Modules), it should list all of the .exe and .dll files the application was using at the time of the crash. We recommend that you check to be sure the copies of the .exe and .dll files you send in are the same ones referenced in the dump file. If the dump file is from a .NET program, you can debug in mixed mode to ensure that the Modules window includes both native and managed DLLs. You can omit any DLLs that are part of Windows (anything with System32 or SysWOW64 in the path), but you should include all other listed .exe and .dll files, along with corresponding .pdb files.
UNIX process
- core or core.######
- The executable being run (dbr, rsynd, isutl, etc.)
OpenVMS process
- file.dmp
- file.exe
- synrtl.exe
- file.dsf (the equivalent of a Windows .pdb file)
Depending on the situation, we may also request other .exe, .dll, .pdb, .so, etc., files (e.g., xfnlnet if the process is an xfNetLink .NET client program, synergy_sdms on OpenVMS if xfServer/xfServerPlus is involved, and ssqlx on OpenVMS or UNIX if SQL Connection is involved).
Dump files are typically too big to send via email. These files compress very well with Zip and even better with 7-Zip, so we recommend that you zip up the dump files and any associated files and upload the archive to a cloud storage site such as OneDrive or Dropbox. Then email support@synergex.com with a download link and a confirmation that the file doesn’t contain any sensitive or restricted information. We’ll let you know when we’ve finished downloading the file so you can remove the upload.
CAUTION: These files contain the entire contents of the process memory, so never post them publicly unless you are comfortable with the possibility of having this information leaked. (For example, the connection information to the SynSQL Service is accessible in these files for someone who knows the code base well enough.) Do not transmit a dump file if your application uses sensitive or restricted data (e.g., subject to HIPAA rules).
More information about dump files
Generating a dump file for a heap corruption issue on Windows (KB#2407)
Finding a method name from a .dbr dump file (KB#2377)
